
Why Your Kitchen Still Feels Dark – Layered Lighting Tips (2026) January 12, 2026 – Posted in: Lighting Information, Tutorials
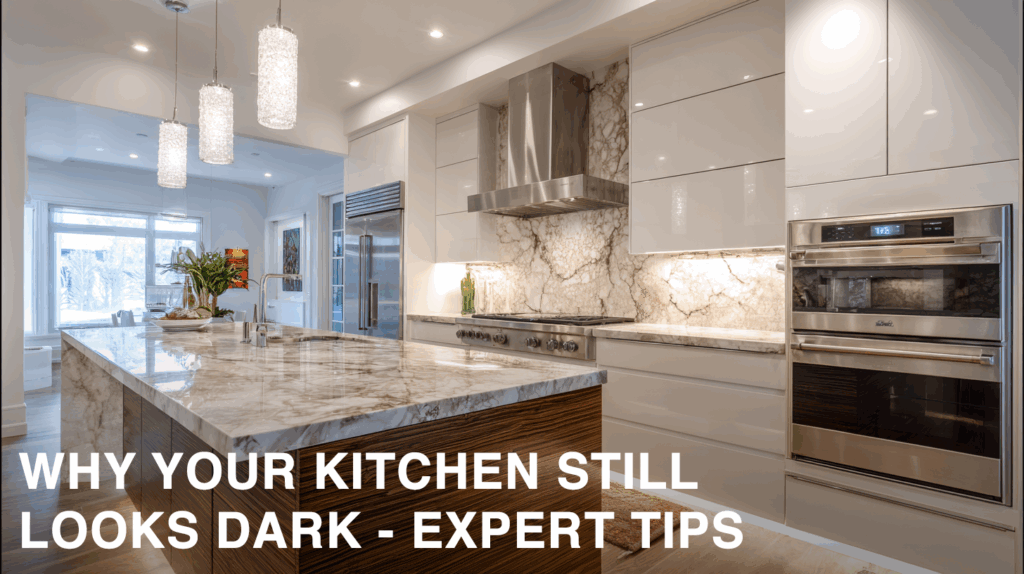
Table of Contents
Kitchen lighting that depends on one overhead fixture almost always creates shadows on countertops, islands, and corners, even with bright bulbs.
A layer lighting strategy fixes that. It combines ambient light, task lighting, and accent lighting so light lands on the surfaces where work happens and where design details matter.
This post will help explain why kitchens feel dark, how to build a layered lighting plan, and how to place fixtures so the room feels brighter, safer, and more inviting.
Key Takeaways
- Single overhead fixtures create the Cave Effect by lighting the center while leaving counters and corners in shadow.
- A layered kitchen lighting plan uses ambient light for the room, task lighting for work surfaces, and accent lighting for depth and visual interest.
- Under-cabinet lighting is the fastest way to improve counter visibility because it puts the light source in front of your body instead of behind it.
- Dimmers work best when you separate circuits, so ambient and task layers can change independently from meal prep to entertaining.
- Color temperature choices matter: 2700K to 3000K reads warm and food-friendly, while 3500K reads more neutral in many kitchens.
The Problem with Single-Source Lighting
We still see the same pattern in kitchens that feel dark: one ceiling light tries to do everything. It cannot.
That single fixture often lights your floor and the tops of cabinets while leaving countertops, the sink, and the island in partial shadow.
Brightness is also easy to misjudge without a simple measurement.
- Ambient lighting should make the full kitchen readable, not dramatic.
- Task lighting should land directly on the work plane, especially on countertops and at the sink.
- Accent lighting should add depth by lighting vertical surfaces and details, so the room does not feel flat.
The “Cave Effect”: How dark corners make a large kitchen feel cramped
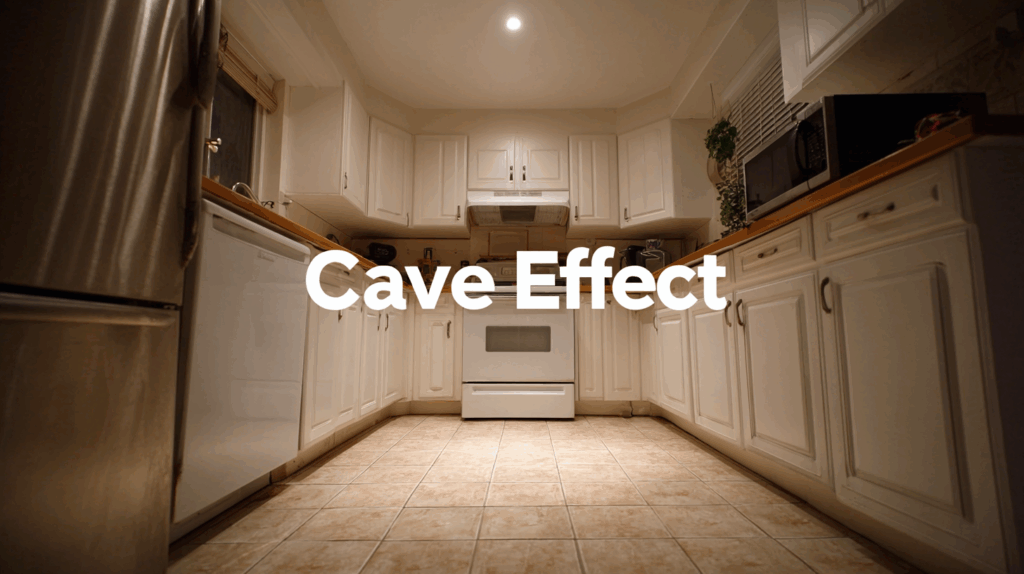
We call it the Cave Effect when the center of the room is bright but the perimeter stays dim. The kitchen can be physically large and still feel tight.
The cause is usually simple: a single chandelier or ceiling fixture cannot reach into corners, under wall cabinets, or onto vertical surfaces.
A layered plan fixes this by mixing layered kitchen lighting with ambient lighting, task lighting, and accent lighting so each zone has the right type of lighting.
For example, recessed lighting and a pendant light over the kitchen island can provide general lighting, while LED strips under cabinetry put light exactly where hands and tools work.
To make a kitchen feel bigger, light the vertical surfaces and the work surfaces, not just the floor.
- Brighten the work plane: Add under-cabinet lighting so your body does not block the light source while you prep.
- Lift the perimeter: Use wall sconces, cabinet lighting, or aimed recessed trims to reduce “dead” corners.
- Reduce glare: Choose diffused lenses or deeper trims where the light source would be visible from common sightlines.
Why high wattage doesn’t always equal high visibility
We often hear “We installed higher wattage bulbs and it’s still dim.” The real issue is usually not wattage, it’s where the light lands.
Wattage is power use, not output. What you want to manage is light output in lumens and the resulting light level on the countertop.
Fixture quality matters too. ENERGY STAR downlight criteria, for example, set performance targets like a minimum efficacy of 82 lumens per watt and minimum light output based on aperture size.
Light placement beats raw wattage.
We plan out a lighting design around activities, because a well-lit kitchen needs different light than a hallway or a living room.
That is also why a direct-to-consumer approach can be useful: it makes it easier to choose specific fixtures, color temperature, and controls without forcing one “standard kit” into every layout.
The Key Layers of Kitchen Lighting

Layered lighting design works because each lighting layer has a clear job. When every fixture tries to do every job, shadows and glare show up fast.
We plan kitchens around three functional layers and then tune the result with dimmers, color temperature, and fixture placement.
This approach to planning your kitchen lighting integrates lighting layers that highlight design elements, provide ambient lighting, and ensure focused light for work areas. The three layers offer a balanced design that enhances interior design and overall aesthetics.
| Lighting layer | Primary purpose | Where it belongs | Common mistakes we see |
|---|---|---|---|
| Ambient light | Provide general illumination and comfortable navigation | Ceiling lights, recessed lighting, and some pendants | Too few fixtures, or fixtures centered in the room but not over the work areas |
| Task lighting | High visibility for prep, cooking, and cleanup | Under cabinets, over the sink, over the island, and key work zones | Relying on ceiling light behind your head, which casts shadows on countertops |
| Accent lighting | Depth, guidance, and visual interest | Toe-kick lighting, in-cabinet lights, shelf lighting, and wall sconces | Over-accenting, which looks busy and creates glare |
Ambient Lighting for General Lighting
Ambient lighting sets the baseline for the room. It should make the kitchen usable even before task lights come on.
Ceiling lights, recessed cans, and pendants can all provide ambient light, but the layout matters more than the fixture count.
- Use a spacing plan: Many recessed lighting layout guides start with spacing fixtures at roughly half the ceiling height (so an 8-foot ceiling often starts around 4 feet between lights), then adjust based on beam angle and lumen output.
- Keep light off the back wall: If the perimeter stays dim, the kitchen will still feel dark even when the center is bright.
- Match finishes to sightlines: Deep baffles and diffused lenses reduce glare in open-concept kitchen design.
Task Lighting for Workspaces

Task lighting is the difference between “bright bulbs” and true visibility. It puts light on the countertop, sink, and cooktop where detail matters.
Under-cabinet lighting is usually the highest impact move because it fills in the shadow line created by upper cabinetry.
- Target the right output: Many under-cabinet lighting guides recommend roughly 300 to 500 lumens per foot for countertop task lighting, then dialing it in with dimmers to prevent glare (per a recent engineer-focused under-cabinet lighting guide).
- Prioritize color quality: For food and finish selection, we often aim for CRI 90 or higher so colors stay consistent across cabinets, backsplash, and countertops.
- Place it forward: Position strips or bars so light reaches the front half of the countertop, not just the backsplash line.
- Control it separately: Put under-cabinet lighting on its own switch or dimmer so prep light does not dictate the room mood.
Accent Lighting to Highlight Design Features
Accent lighting adds depth. It also makes a kitchen feel well-lit because the eye reads the room as brighter when vertical surfaces and key details are illuminated.
We use cabinet lighting, toe-kick lighting, picture lights, and wall sconces to highlight architectural features and create visual interest without overpowering the workspace.
- Toe-kick lighting: A subtle floor glow helps with late-night wayfinding and makes base cabinets look lighter.
- In-cabinet lighting: Glass-front cabinets and open shelving read cleaner when the back panel is softly lit.
- Control glare: For clear or open fixtures, frosted bulbs or diffusers usually reduce harsh hotspots.
Designer Tips for Kitchen Lighting and Layered Lighting
We plan kitchen lighting from the work surface outward. Once the counters look right, the rest of the room becomes easier to balance.
This approach also prevents the common mistake of overbuilding the ceiling plan and still ending up with dark countertops.
Visual diagrams enhance comprehension of the layered lighting scheme and show how light fixtures can create an inviting atmosphere in your home. They clearly illustrate how to adjust the lighting layers for optimal performance and aesthetics.
- Start with the work zones: Identify the sink, prep counter, cooktop, and island, then assign task lighting to each.
- Build a layered lighting plan: Set your ambient layer, then add task, then add accent, in that order.
- Choose one color temperature family: ANSI standards for LED products define nominal CCT families such as 2700K, 3000K, and 3500K, which helps keep your selections consistent (as described in ANSI NEMA C78.377-2024 overviews).
- Use CRI strategically: If your kitchen design includes strong color choices in cabinetry, paint, or tile, high color rendering reduces surprises when you shop and cook. Some energy code requirements, such as California’s JA8, set CRI 90 as a threshold for certain non-tunable LED installations.
- Decide your control zones early: Plan separate controls for recessed lighting, pendants, under-cabinet lighting, and accent layers so the room adapts to different activities.
- Test before final install: During a kitchen remodel, temporary plug-in lights or mock placements can reveal where shadows fall before you cut holes or commit to junction boxes.
| Color temperature | How it reads in a kitchen | Where we see it work well |
|---|---|---|
| 2700K to 3000K | Warm and food-friendly | Traditional kitchens, warm metals, cozy dining corners |
| 3500K | Neutral, less yellow | Mixed finishes, many modern cabinet colors, balanced task lighting |
| 4000K (selective use) | Crisp, can feel cooler | Some task-heavy zones, especially where true color matching matters |
Strategic Placement for Kitchen Lighting Design
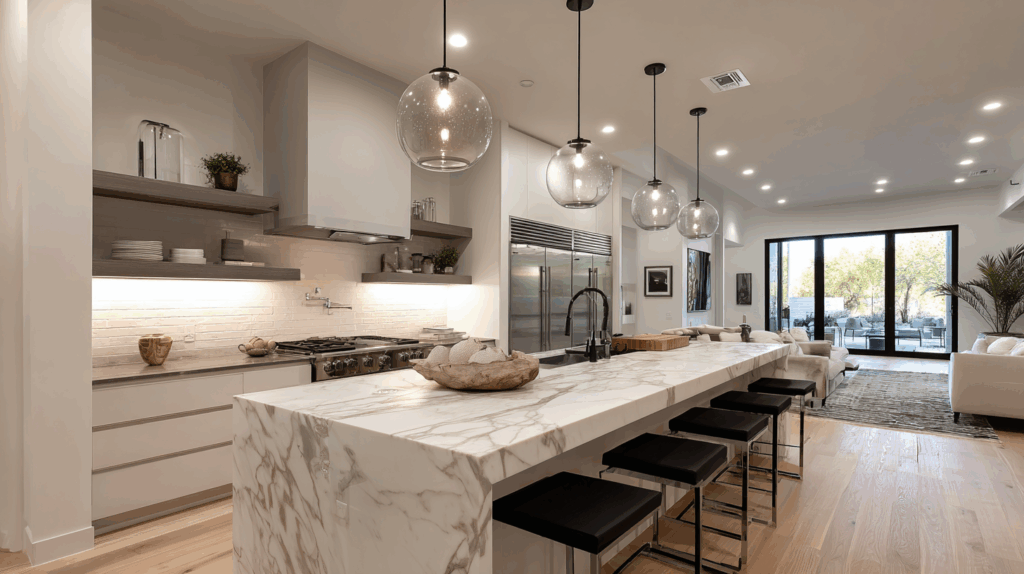
Strategic placement is mastering the art of kitchen lighting design, because placement determines shadows, glare, and how “open” the room feels.
We place pendants over islands, recessed fixtures for ambient light, and under-cabinet lighting at counters so each layer serves a clear purpose.
For island pendants, most hanging-height guidelines start with the bottom of the pendant about 30 to 36 inches above the countertop, then adjust for ceiling height and sightlines.
- Island: Use pendants or a linear fixture to bring light down to the workspace without blocking views across the room.
- Sink: Add a dedicated light source so your hands do not cast a shadow while you wash or prep.
- Perimeter counters: Combine recessed light placement with under-cabinet lighting to eliminate the cabinet shadow line.
- Dark corners: Use sconces or a floor lamp where ceiling light does not reach, especially near breakfast nooks or open shelving.
The “Work Triangle” rule: Placing lights where your body won’t block the source

The work triangle concept matters because it maps where people stand. If lighting sits behind the body at those points, shadows are guaranteed.
- Place task lighting at the sink, stove, and primary prep zone so your body does not block the light source.
- Aim lights along the work triangle so movement between sink, range, and refrigerator stays well-lit.
- Over islands, use pendant fixtures or aimed recessed lights so the island surface stays bright without glare.
- Add wall sconces or other vertical light near tall cabinets to reduce the Cave Effect and improve room depth.
- During a remodel, coordinate lighting with electrical planning. NEC 2023 updates include expanded GFCI requirements for kitchen receptacles and new guidance that makes island and peninsula receptacle placement optional, but restricted to safer locations when installed (as described in NEC 2023 update summaries).
Using dimmers to transition from meal prep (bright) to entertaining (moody)

Dimmers make a kitchen flexible. They also protect comfort, because the “right” light level changes throughout the day.
The key is to separate layers so you can dim ambient light without sacrificing task lighting.
- Put ambient and task on separate dimmers: This keeps the kitchen useful even when you lower the overall mood.
- Confirm LED compatibility: Flicker and dropout usually come from mismatched dimmers and drivers, not from the LED itself.
- Look for meaningful dimming range: ENERGY STAR downlight requirements include continuous dimming down to at least 20% output for products marketed as dimmable, which is a practical baseline for smooth scenes (per ENERGY STAR downlight criteria).
- Use scenes with intent: Keep one “prep” setting that stays bright and one “entertaining” setting that keeps accents on while lowering general illumination.

I have been the project manager for Modern.Place since early 2016, spending three of those years working overseas on the manufacturing & procurement side of the LED lighting industry. Constantly learning and passing on knowledge to others while excited for what the lighting industry will involve into next.
